Remote Work (VPN)
Attach your VPN Request form to a Helpdesk ticket.
Users must successfully complete the mandatory annual Security Awareness Training, and a department head and vice president or provost must approve the request.
The following services are available to all VPN users, with the exception of those designated as vendors:
- Internet access
- Remote desktop services
- To all designated administrative and faculty/staff networks
- Core services, including Windows updates and ESET Antivirus updates
- File servers
- Isilon (\files and \space)
- Jupiter
- Web browsing and secure web browsing (SSL) access
- Banner 9 admin pages (BPDB only)
- ColdFusion
- Atlassian suite, including Jira, Confluence, Stash and Bamboo
- Nolij
- Cascade (production, development)
- Library archive server
- SSH access to various servers
- Mitel connect access
There are two primary types of remote access available via the VPN:
- Using on-campus services (such as F:) from your CNU computer while off-campus (primary method)
- Remote desktop from a personal computer to a Windows workstation in your office (see instructions below). This option requires your personal computer to have current OS patches and up-to-date antivirus/malware such as Windows Defender (included in Windows 10) as well as Microsoft Remote Desktop Software.
- If your personal computer does not have Microsoft Remote Desktop, download Microsoft Remote Desktop from the Microsoft Store.
Yes, if your VPN connection is active and you know the name of your desktop computer (typically something like DPTDED12345678), you can remote back to it.
- You can find the name of your desktop computer by following these simple instructions. Please ensure you copy the name carefully!
On a Windows PC:
- University-owned Windows computers should have the VPN installed and configured. If not, visit gpvpn.cnu.edu.
- Log in to the GP VPN portal with your CNU credentials.
- Download the 64-bit GlobalProtect agent.
- When the download is complete, install the agent.
- Enter the portal address: gpvpn.cnu.edu
- Enter your CNU Connect login credentials when prompted.
- VPN connection is successful when “Connected” is displayed along with a pop-up window with “Palo Alto Networks - GlobalProtect Welcome Page”.
On a Mac:
- Visit gpvpn.cnu.edu
- Log in to the GP VPN portal with your CNU credentials.
- Download the Mac 32/64 bit GlobalProtect agent.
- Install the agent and unblock the necessary extensions.
- If necessary, open the Security & Privacy preferences, select General, and then click to allow/unblock the app.
- Enter the portal address: gpvpn.cnu.edu
- Enter your CNU Connect login credentials when prompted.
- VPN connection is successful when “Connected” is displayed in agent along with a pop-up window with “Palo Alto Networks - GlobalProtect Welcome Page”.
No, not at this time. Remote desktop services are only available on Windows computers.
These instructions assume a successful VPN connection
Please remember that in order to maintain a connection to the files.cnuadmin.cnu.edu server, the VPN must remain connected. If your computer sleeps or reboots, you will have to reconnect to the VPN and follow these steps to connect to files again.
On a Windows PC:
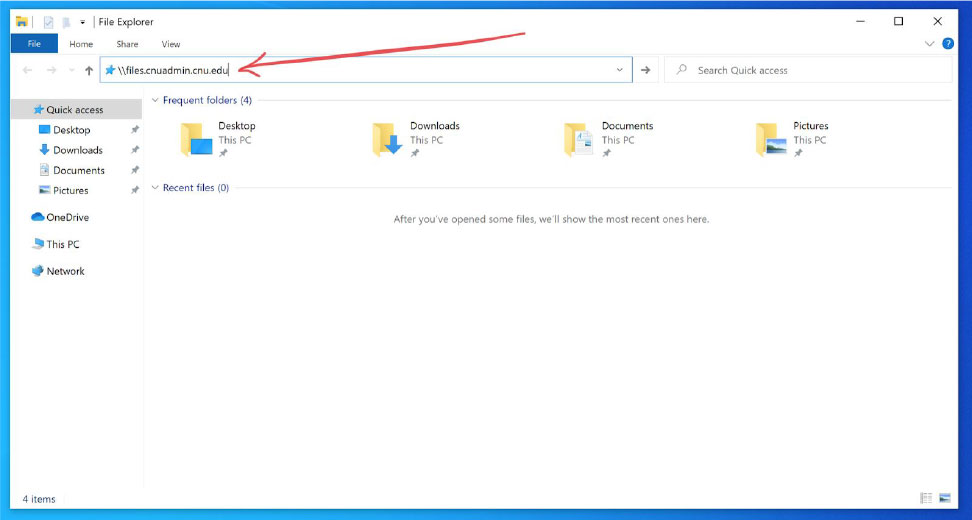
- In a File Explorer window, type \\files.cnuadmin.cnu.edu (see example below).
- NOTE: the preceding \ is required for a successful connection.
- Press Return/Enter.
- In the new “Enter network credentials” box:
- For User name, enter CNUADMIN\[Your CNU ID number] example: CNUADMIN\00123456
- NOTE: the \ between “CNUADMIN” and your ID number is required
- Password: [Your CNU Connect Password]
- For User name, enter CNUADMIN\[Your CNU ID number] example: CNUADMIN\00123456
- You will see four folders appear in the File Explorer window
- Collaborative
- Departments
- Personal
- Scans
On a Mac:
- In Finder, select Go and Connect to Server.
- In the “Connect to Server” window, type smb://files.cnuadmin.cnu.edu, and then press Return/Enter.
- NOTE: the // is required for a successful connection
- You will be prompted for your CNU Connect credentials.
- Name: CNUADMIN\[Your CNU ID number] example: CNUADMIN\00123456
- NOTE: the \ between “CNUADMIN” and your ID number is required.
- Password: [Your CNU Connect Password]
- Name: CNUADMIN\[Your CNU ID number] example: CNUADMIN\00123456
- Click Connect.
- You will be presented with a list of “volumes” to select from
- For your department, click Departments, and then click OK.
- For a Collaborative folder, click Collaborative, and then click OK.
- For a Personal folder, click Personal, and then click OK.
See the Christopher Newport University VPN Standard.